
What’s New in Laravel 11: Latest Features and Updates
Laravel
When it comes to content management systems especially Headless CMS, one can’t undermine the significance of Strapi. An open-source platform, Strapi is really powerful and has a lot of advantages.
If you’re new to Strapi, I recommend you read this blog first - Strapi Headless CMS - Everything You Need To Know!
In this guide, we’ll cover the advanced topics associated with Strapi CMS. This article covers the advantages, features functions of Strapi CMS and a Strapi tutorial on how to create an app with Strapi Headless CMS.
Fasten your seat belt and let’s drive in!
Strapi provides a really useful tool to document your API endpoints – the Strapi Explorer. Through its interface, you can easily modify your data model and set up the required actions for each endpoint. Also, it enables developers to create new APIs from existing ones or export them as an OpenAPI v3 specification.
If you need more documentation for your API, there’s a built-in documentation generator that generates beautiful Swagger pages on the fly. It just takes a minute to set up, and it will greatly improve your developer experience.
But that’s not all: You can also easily export data from your database into JSON or XML files thanks to its Scrape tool. This way, you can create cached lists of restaurants or products for faster loading on the user’s side. And scraping is accurate and very quick since it uses virtualization techniques like the V8 engine.
Strapi not only has a great community but also provides an amazing set of plugins that can be easily installed on your new or existing application. For instance, you can install guides or error pages to improve the development process or create REST API endpoints for authentication with OAuth providers like Facebook or Twitter. Or even more, there are some interesting plugins like Google Analytics integration, LDAP support, and Swagger integrations that make Strapi stand out from other CMS platforms.
You will always find what you need since people are constantly creating new plugins to extend Strapi functionality. You can even build your own custom plugin in just a few minutes.
Strapi is not only free to use, but you can also contribute on GitHub. You can even fork the code and adapt to or improve it for your own needs.
You will not waste time trying to find an alternative, and everything is available right on your dashboard. It’s released under the MIT license, so it’s perfect for any type of project. And don’t worry about licenses or updates. Strapi always provides the latest version of Node.js, which means that you won’t have compatibility issues.
As an open-source project, it also has a great community of developers who support each other in order to improve the platform and make it even more powerful.
Use REST, GraphQL, JSON, or all of them to grab your data.
Choose a PostgreSQL, MongoDB, SQLite, MySQL, or MariaDB database for your project.
A powerful Node.js backend framework and React.js admin panel.
Based on a customizable Model-Service-Controller pattern.
Your content-type files are automatically generated once they are created in the editor.
Include advanced filtering, sorting, and pagination policies for managing authentication.
Automatically build out the schema, models, controllers for your API from the editor.
Make your API public in a couple of clicks with the automatic creation of your database schema or connections.
Customise the API and extend the Models Controllers from the editor or directly from the API folder.
To build a Strapi project, you will need
Node.js v14.x or lower. Strapi requires it as a dependency. You can get a v14.x release from the Node.js releases page. Pick an appropriate installer for your OS.
npm i strapi -g
In this step, you will install the Strapi app and set up an administrator account on its admin panel. The Strapi app will be named editorial-strapi-app. To create the Strapi app, switch directories to where you’d like the app to reside. Run the following command on your terminal:
strapi new editorial-strapi-app --quickstart
Running this command will create the Strapi app, install its dependencies, and start it. The --quickstart flag will generate the Strapi app using Strapi’s quick start system. The Strapi app will use SQLite as a database.
Once the installation completes, you will be redirected to the Strapi admin panel. Here you will have to create an administrator account before you can proceed. Fill out the page and create an account.

After you sign up, you will be redirected to the admin panel. This is where you will add content, media, and content types. You can also manage Strapi app and plugin settings on the panel.
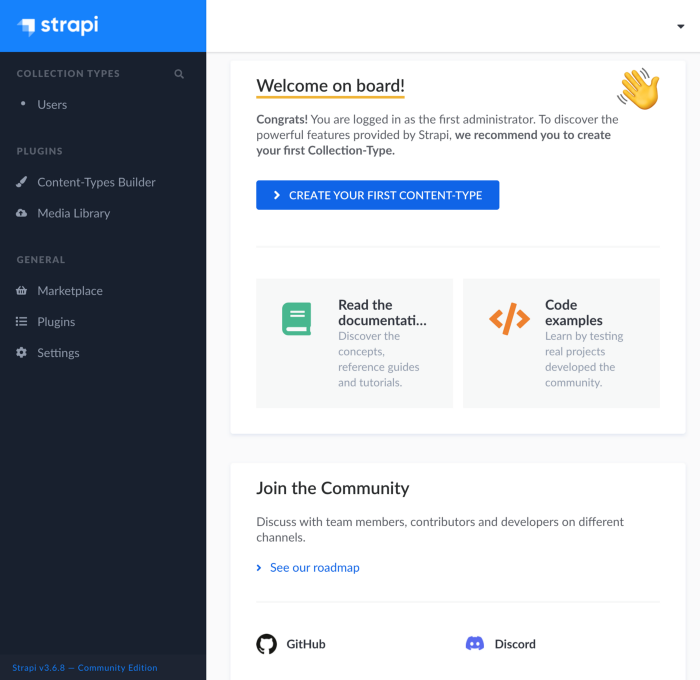
By the end of this step, you should have installed the Strapi app and created an administrator account. You should have also accessed the admin panel. In the next step, you will generate an article API.
To create an article on Strapi, you first need to set up a content type for it. In this step, you will not only create an article content type but generate a whole API for it. First, you need to decide what attributes the article content type will have. For this tutorial, it will have 5:
Field NameField TypeField DescriptionTitleStringThis is the title of the article. Cover ImageMediaThis is the main image displayed for the article.DescriptionTextThis is a brief introduction of what the article is all about. ContentRich TextThis is the actual content of the article in markdown format.TagsComponentThese are the tags associated with the article.
To generate the article API, stop the running Strapi app on the command line. Then run this command:
mkdir -p components/tag && touch components/tag/tags.json
Running this command will create the tags component which you will later use when creating the article API. In components/tag/tags.json, add the following:
{

   "collectionName": "components_tag_tags",
   "info": {
   "name": "Tags",
   "icon": "tags",
   "description": ""
   },
  "options": {},
  "attributes": {
        "name": {
             "type": "string",
             "required": true,
             "unique": true
        }
    }
}
A tag will have one attribute: name. Each tag name needs to be unique and non-empty, that’s why required and unique are set to true.
Next, you will generate the article API. Run this command:
strapi generate:api article content:richtext title:string description:text
This command will generate an article API. It will create the article model, its routes, controllers, and services. You’ll notice that a new folder has been added at api/article. This is where this API resides.
Running this command is limiting as you are unable to specify finer details for the attributes like whether its required. You will have to modify the attributes in the model settings file, at api/article/models/article.settings.json. Since it’s not possible to specify a media or component type with this command, you will also have to add the missing cover_image and tags attributes. In api/article/models/article.settings.json add the following:
{
     "kind": "collectionType",
     "collectionName": "articles",
      "info": {
       "name": "article",
       "description": "Articles for the editorial site"
       },
     "options": {
     "increments": true,
     "timestamps": true,
     "draftAndPublish": true
      },
     "pluginOptions": {},
      "attributes": {
      "content": {
      "type": "richtext",
   "required": true
},
"cover_image": {
   "model": "file",
   "via": "related",
   "allowedTypes": "[Images]”,
   "plugin": "upload",
   "required": true,
   "pluginOptions": {}
},
"description": {
   "type": "text",
   "required": true
},
"tags": {
   "type": "component",
   "repeatable": true,
   "component": "tag.tags"
},
 "title": {
   "type": "string",
   "required": true,
    "unique": true
       }
    }
}
Now you can start the Strapi app to confirm that the articlecontent type has been added. Do this by running:
npm run develop
In this step, you generated the article API. In the next one, you will make the routes created in this step public.
When you generate the article API, six routes are created. These routes expose functionality to:
- create an article
- update an article
- delete an article
- return an article using its ID
- return all articles
- return a count of articles.
However, all these routes are made private and will return a 403 forbidden error when called. For this tutorial, you will need two routes: one that returns an article given its ID and another that returns a list of articles. These are the routes that you shall make public in this tutorial. Here’s how you will do this:

In this step, you made the articles and articles/:id routes public. In the next step, you shall add sample articles for the routes to return.
In this step, you will create sample articles that the public API routes will return. You will do this by:
Make at least three articles to use for your editorial site. Here’s what that form should look like.

In this step, you created at least three articles to display on your editorial website. In the next step, you will clone a starter editorial app and fetch the articles from the Strapi app.
The editorial site that will display the articles is made from HTML, CSS, and vanilla JavaScript. No framework will be used in it. In this step, you will clone a starter editorial app from Github that contains all the styling and HTML markup. All you will have to do in the subsequent steps is to add the vanilla JavaScript files to fetch the articles from Strapi.
Pick a directory where you want to put the editorial site. Run this command on your terminal:
git clone github.com/zaracooper/editorial-app.git
Once the cloning is complete, switch directories into editorial-app.
cd editorial-app
The app has two branches: main which is the complete app and starterwhich is what you will build off of. Switch branches to starter by running:
git checkout starter
Next, install the app’s dependencies.
npm install
The app uses a couple of dependencies: [lite-server](https://www.npmjs.com/package/ lite-server ) to serve the app and [showdown](https://www.npmjs.com/package/ showdown ) to convert markdown to HTML. These are what are installed above.
You can now run the server. Note that the scripts that fetch the articles from Strapi and populate the pages with them are still empty. So the pages will be mostly blank apart from a few titles. To run the app use:
npm run dev
Running the above command will launch the app in a browser at localhost. When you make any changes, lite-server will reload the open pages. Now you can start adding code to fetch the articles from Strapi.
In this step, you cloned a starter editorial app from GitHub, installed its dependencies, and launched it. In the proceeding step, you will fetch a list of sample articles you created from Strapi and display them on the home page.
The home page, index.html, displayed at localhost is pretty bare. During this step, you will fetch the articles from localhost: 1337/articles and display them on the home page.
The script for the home page is located at scripts/index.js. It has two functions:
Here’s the code for the scripts/index.js file. It is the script for the index.htmlpage. Copy this code into the scripts/index.js file.
// scripts/index.js
   function fetchArticles() {
       const articlesReq = new Request('http://localhost:1337/articles');

       fetch(articlesReq)
           .then(response => response.json())
           .then(articles => {
               let articleList = document.getElementById("article-list");

               articles.forEach(article => {
                   articleList.appendChild(createArticleCard(article));
               });
           });
   }

   function createArticleCard(article) {
       let card = document.createElement("div");
       card.classList.add("card");
       card.onclick = () => {
           window.location.replace(`/pages/article.html?id=${article.id}`)
       };

       let cardImage = document.createElement("img");
       cardImage.classList.add("card-img");
       cardImage.src = `http://localhost:1337${article.cover_image.formats.thumbnail.url}`;

       let cardBody = document.createElement("div");
       cardBody.classList.add("card-body");

       let articleTitle = document.createElement("p");
       articleTitle.classList.add("card-title");
       articleTitle.innerHTML = article.title;

       let articleDescription = document.createElement("div");
       articleDescription.classList.add("card-description");
       articleDescription.innerHTML = article.description;

       let articleTags = document.createElement("div");
       articleTags.classList.add("article-tag-cont");

       let tag;

       article.tags.forEach(tg => {
           if (tg.name) {
               tag = document.createElement("span")
               tag.classList.add("article-tag");
               tag.innerHTML = tg.name;
               articleTags.appendChild(tag);
           }
       });

       cardBody.append(articleTitle, articleDescription, articleTags);

       card.append(cardImage, cardBody);

       return card;

   }

   fetchArticles();
Here is a screenshot of what this page should look like.
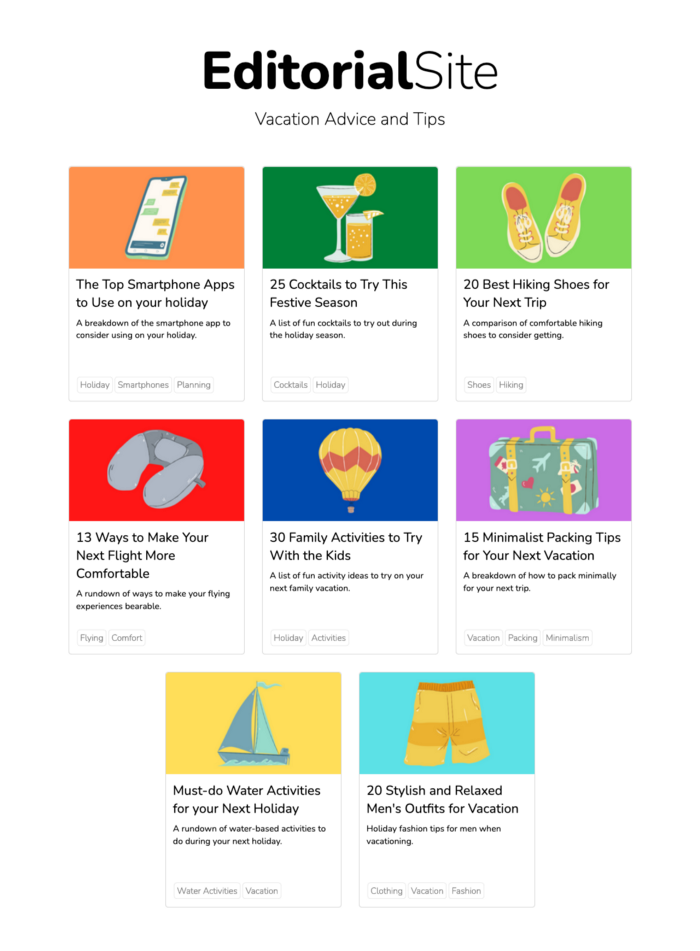
In this step, you added code to the index page script to fetch articles from Strapi and populate them on the home page. In the step that follows, you will fetch a single article from Strapi and display it on the article page.
The last thing to do is display the content of an article. Using the id passed as a query parameter, you will fetch the article from the Strapi app. You will then convert the markdown content to HTML and add it to the page.
Once an article card is clicked on the home page, the user is redirected to this link: localhost:3000/pages/article.html?id={id}. The id of the article on the Strapi app is provided as a query parameter. You will take that id and use it in the request URL to the Strapi app.
The script for the article page, pages/article.html, is found at scripts/article.js. Copy the code below and add it to that file.
// scripts/article.js
   function checkForArticle() {
       const urlParams = new URLSearchParams(window.location.search);
       const articleId = urlParams.get('id');

       if (articleId) {
           getArticle(articleId);
       } else {
           showMissingArticleMsg        ("An article can't be retrieved without an ID.");
       }
   }

   function getArticle(id) {
       const articleReq = new Request(`http://localhost:1337/articles/${id}`);

       fetch(articleReq)
           .then(resp => {
               if (resp.ok) {
                   return resp.json();
               } else {
                   throw new Error(resp.statusText);
               }
           })
           .then(displayArticle)
           .catch(showMissingArticleMsg);
   }

   function displayArticle(article) {
       document.getElementById("article-img").src = `http://localhost:1337${article.cover_image.url}`;
       document.getElementById("article-title").innerHTML = article.title;
       document.getElementById("article-description").innerHTML = article.description;
       document.getElementById("published_date").innerHTML = (new Date(article.published_at)).toDateString();

       let articleTags = document.getElementById("article-tags");
       let tag;

       article.tags.forEach(tg => {
           if (tg.name) {
               tag = document.createElement("span")
               tag.classList.add("article-tag");
               tag.innerHTML = tg.name;
               articleTags.appendChild(tag);
           }
       });

       const showdown = window.showdown;
       const converter = new showdown.Converter();
       document.getElementById("article-content").innerHTML = converter.makeHtml(article.content);
       document.getElementById("article-cont").style = "display: flex; display: -webkit-box; display: -ms-flexbox;";
   }

   function showMissingArticleMsg(msg) {
       document.getElementById("not-found").style = "display: flex; display: -webkit-box; display: -ms-flexbox;";
       document.getElementById("err-msg").innerHTML = msg;
   }

   checkForArticle();
This script has four functions. checkForArticle() checks that an id has been provided in the URL. If there is one, it will call getArticle() which fetches the article from Strapi. If not, it calls showMissingArticleMsg() which displays an error message. The screenshot below shows what that looks like. checkForArticle() is called when the file is loaded.
showMissingArticleMsg() displays an error message on the page whenever there is a problem fetching an article. It’s called several times by the other functions.
Here’s a screenshot of what this page looks like when an article is populated.

This page is available at localhost:3000/pages/article.html?id={id} where id is the ID of an existing article on the Strapi app.
This is the end. Woohoo! You’ve created and editorial website using Strapi and vanilla JavaScript.
In this tutorial, you installed a Strapi app and generated an article API and know the key benefits of a headless CMS, you might be interested in starting your next project with this technology.
Whether you’re a CTO or a developer working for an omnichannel brand, you'll see the difference when you get started.
Strapi.io is the most advanced Node.JS-based open-source headless CMS. In minutes, you will be able to create your first content type and immediately make it available through a lightweight API.
In case you need our assistance with Strapi, we are always available with Strapi consultation whenever needed!
Do you have queries or questions about Strapi? Which feature do you love the most about Strapi? Drop us your views in the comment section below!
Happy Strapping!

I bring strong exposure and experience of software operations, marketing, project strategies, and game-changing partnerships to my position as a CEO of NITSAN & T3Planet. I am the face responsible for driving the venture's growth and development as the company continues to expand. I'm a technocrat and a Quick Learner with 13+ years of experience in the IT industry!


Comments and Responses