What's a "stack"?
"A stack is simply the different technologies being used to accomplish that goal."
Although there are many different stacks out there to consider, some have become more common than others. One of these popular stacks is called the MEAN stack which consists of
- MongoDB - document database
- Express(.js) - Node.js web framework
- React(.js) - a client-side JavaScript framework
- Node(.js) - the premier JavaScript web server
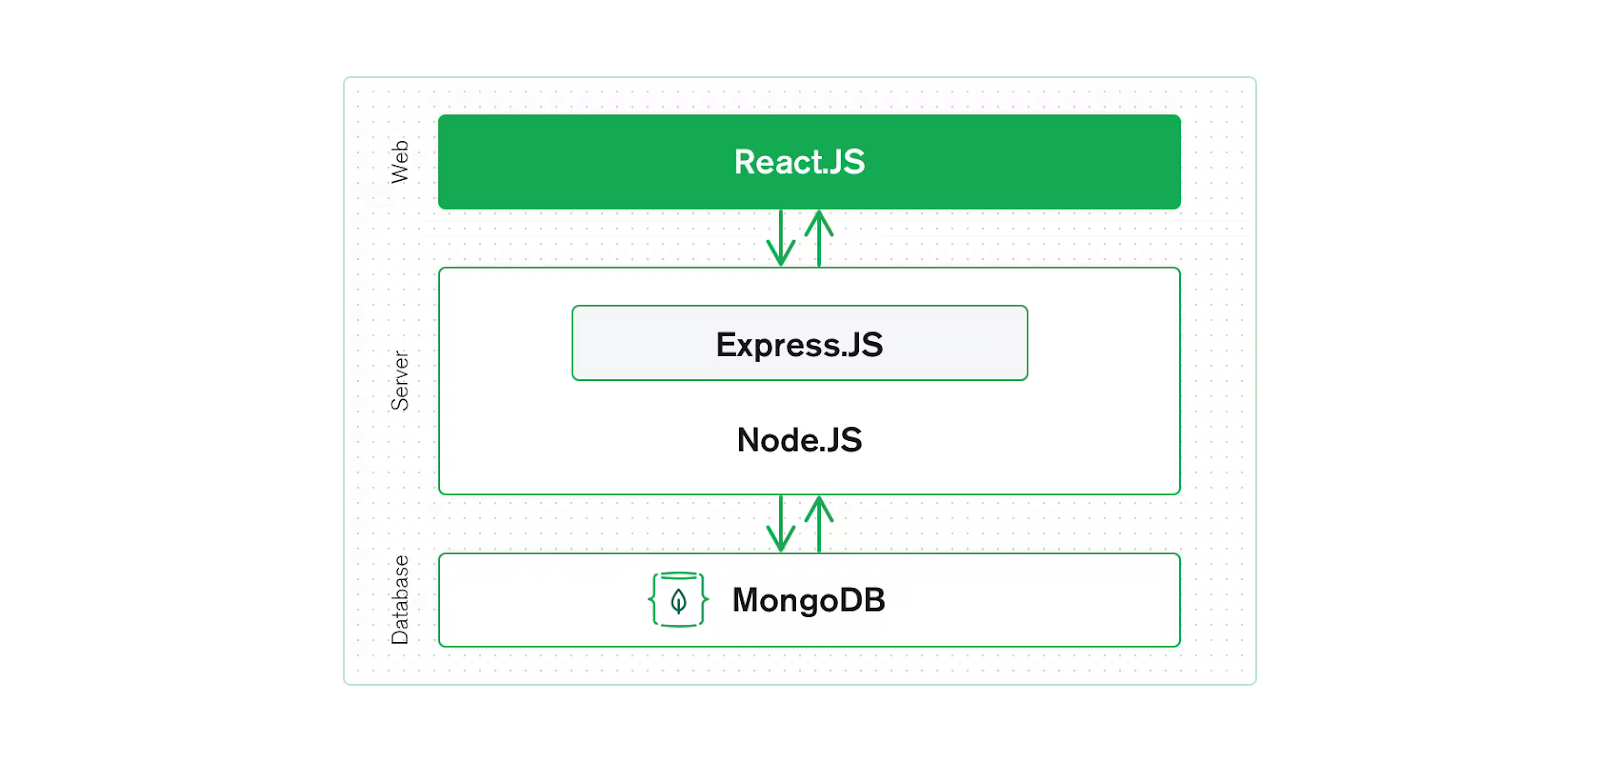
Today we will be looking at the MERN stack which is almost the same as MEAN except we will replace Angular js with React js. This will allow us to use MongoDB for our database, Nodejs and Express js for our server and routes, and React js to create a front-end for the user to interact with.
What's MERN Stack?
1) MongoDB: A cross-platform document database
MongoDB is a document database in which data is stored in flexible documents with a JSON-based query language. The content, size, and number of fields in the documents can differ from one another which means that the data structure can be changed over time. MongoDB framework is best known for its flexible and scalable features.
Features of MongoDB:
- Built-in scalable environments.
- MongoDB can run over multiple servers. Here the data is duplicated to keep the system up in case of any hardware failure.
- It supports Master-Slave replication. The framework uses native applications to maintain multiple copies of data.
- It supports MapReduce and flexible aggregation tools.
- MongoDB JavaScript works well as the database uses the language instead of procedures.
Why use MongoDB?
- It makes all the way easy to index documents
- Ensure scalability as large data can be handled easily by dividing it into several machines
- Schema Less as any type of data stored in a separate document
- It’s really simple to set up a MongoDB environment
- It supports a flexible document model which is fast to create
- Costs are significantly lowered as MongoDB runs on commodity hardware.
2) Express: A back-end web application framework
Express is a web application framework for Node.js, another MERN component. Instead of writing full webserver code by hand on Node.js directly, developers use Express to simplify the task of writing server code. There’s no need to repeat the same code over and over, as you would with the Node.js HTTP module.
The Express framework is designed for building robust web applications and APIs. It’s known for its fast speed and minimalist structure, with many features available as plugins.
Why use ExpressJS?
- Asynchronous and Single-threaded.
- It is fast and scalable
- It helps with code reusability using a built-in router.
- Robust API
3) React: Library for building User interfaces
React is an open-source and free frontend JavaScript library released by Facebook. It is used for building interactive UI (user interface) of web applications. It handles the view layer and can be used to develop both mobile and web applications.
React enables developers to form encapsulated segments that maintain their state and then comprise them to make complicated interfaces. Using Node, React also renders on the server.
Features of React
- The virtual DOM is a lightweight copy of the original DOM. Includes all the properties of the real DOM.
- Supports one-way data-binding which means that the data flows in one direction throughout the whole application. This gives better control over it.
- ReactJS is a component-based framework. The code is written in templates to make it easy to pass the entire data through the application.
Why use ReactJS?
- It facilitates developers to work faster and makes the user experience better.
- It relies on a virtual DOM and re-renders only what has really changed, hence better performance-wise
- Helps tight binding of values or handling of local variables vs global variables
- One-direction data flow provides a stable code
4) Node.js: A JavaScript runtime environment
Node.js was initially built for Google Chrome, and later open-sourced by Google in 2008. It is built on Chrome’s V8 JavaScript engine. It’s designed to build scalable network applications and can execute JavaScript code outside of a browser.
Node.js works without an enclosing HTML page, instead of using its own module system based on CommonJS, to put together multiple JavaScript files.
Features of Node
- Being built on Google Chrome's V8 JavaScript Engine, the Node.js library is very fast in code execution.
- Node.js applications never buffer any data. They simply output the data into chunks.
- All APIs of the Node.js library are asynchronous. The server simply never waits for an API to return data.
- Node.js uses a single-threaded model with event looping.
Why use Node?
- It is open-source, friendly, and easy to use.
- The code is the same on the web app and the server.
- Powerful server-side applications can be built with Node.js.
- It supports open-source JavaScript Runtime Environment
- Node.js has a fast code execution as it is built on Google Chrome’s JavaScript Engine
- It is highly scalable
How Does MERN Stack Works?
You need to have a basic understanding of all the four technologies that make up the MERN stack. You should also have npm (Node Package Manager) installed. Further, in this blog post, we’ll set up everything from scratch, however, to give you a better idea of how the pieces fit together. Let’s get started!
Getting Started
- Create a directory on your computer called mern-starter (or whatever you like).
- cd into that directory.
- Create a backend and a frontend repo on github or using the command line.
- Clone both repos into the mern-stack directory.
- cd into the backend repo and run npm init -y.
- Next, run touch index.js README.md .eslintrc.json .eslintignore .gitignore .env.
- Then, run npm i -S express http-errors mongoose superagent body-parser cors dotenv.
- Finally, run npm i -D jest eslint.
- With that, we’ve got our basic scaffolding setup for the backend. Go ahead and configure your .eslintrc.json, .eslintignore, .gitignore and .env.
Your .env file should contain your environment variables:
PORT=3000
DEBUG=true
API_URL=http://localhost:3000
CORS_ORIGINS=http://localhost:8080
APP_SECRET='something secret'
MONGODB_URI=mongodb://localhost/mern-starter
Your package.json should have all of the installed dependencies as well as these scripts:
"scripts": {
  "lint": "eslint ./",
  "test": "jest -i --verbose --coverage --runInBand",
  "start": "node index.js",
  "dboff": "killall mongod",
  "watch": "nodemon index.js",
  "dbon": "mkdir -p ./db && mongod --dbpath ./db"
},
Next, we’re going to set up our server:
- Navigate into your editor and open your project.
- From the root of your backend repo create a src folder.
- Inside of the src folder create a main.js file, a lib folder, a middleware folder, a model folder, and a route folder.
Navigate into the lib folder and create a server.js file - this is where we are going to set up our server and connect it to MongoDB:
'use strict'

import cors from 'cors';
import express from 'express';
import mongoose from 'mongoose';
import bodyParser from 'body-parser';

const app = express();
const router = express.Router();

// env variables
const PORT = process.env.PORT || 3000;
const MONGODB_URI = process.env.MONGODB_URI || 'mongodb://localhost/mern-starter';

mongoose.Promise = Promise;
mongoose.connect(MONGODB_URI);

app.use(bodyParser.json(),cors())

app.use(require('../route/auth-router'));


app.all('*', (request, response) => {
  console.log('Returning a 404 from the catch-all route');
  return response.sendStatus(404);
});


// error middleware
app.use(require('./error-middleware'));


export const start = () => {
  app.listen(PORT, () =>{
    console.log(`Listening on port: ${PORT}`)
  })
}

export const stop = () => {
  app.close(PORT, () => {
    console.log(`Shut down on port: ${PORT}`)
  })
}
This is a very basic server setup. At the top of our file we are importing our npm packages.
- We are setting up our express router and connecting to mongoose, then requiring-in our routes and middleware.
- We then export the start and stop variables that turn our server off and on and log what PORT we are on.
- The next thing we need is to go into our index.js file at the root of our backend repo and require('./src/lib/server').start(). This is requiring-in our server file and starting the server.
Setting Up MERN Schema Modules
Keep in mind you should create at least one model and one route before trying to start the server. Below you’ll find a sample MongoDB schema and a sample route.
We’ll create a user Schema, known as the user model. Each schema maps to a MongoDB collection and defines the shape of the documents within that collection. Here we are declaring all of the properties we can expect users to have attached to their model, what data type they are, if they are unique or not and if we want them to be required or not.
In this same file, we can create methods like User.create() which is how we create new users.
const userSchema = mongoose.Schema({

  passwordHash: { type: String, required: true },

  email: { type: String, required: true, unique: true },

  username: { type: String, required: true, unique: true },

  tokenSeed: { type: String, required: true, unique: true },

  created: { type: Date, default : () => new Date()},

});

const User = module.exports = mongoose.model('user', userSchema)
And then in the following snippet are auth routes - we’re using express’s Router to create routes and endpoints allowing a user to signup or login to our app:
'use strict'

import { Router } from 'express';

import bodyParser from 'body-parser';


import basicAuth from '../lib/basic-auth-middleware.js'

import User from '../model/user.js';

const authRouter = module.exports = new Router();

authRouter.post('/api/signup', jsonParser, (req, res, next) => {

  console.log('hit /api/signup')

  User.create(req.body)

  .then(token => res.send(token))

  .catch(next)

})

authRouter.get('/api/login', basicAuth, (req, res, next) => {

  console.log('hit /api/login')

  req.user.tokenCreate()
  .then(token => res.send(token))
  .catch(next)
})
Now return to our terminal, make sure we cd into the backend repo, and run the command npm run dbon, this should start mongodb. Then open a new backend terminal tab and run the command npm run start.
And that’s it for a bare minimum backend setup! Let’s now set up a very basic frontend with React.
Frontend Setup With React
- cd into the frontend directory and run npm init -y to create a package.json file.
- Next, run touch README.md .eslintrc.json .eslintignore .gitignore .env .babelrc webpack.config.js.
- Then, run npm i -S babel-core babel-loader babel-plugin-transform-object-rest-spread babel-preset-env babel-preset-react css-loader extract-text-webpack-plugin html-webpack-plugin node-sass react react-dom resolve-url-loader sass-loader webpack webpack-dev-server babel-cli.
- Be aware that extract-text-webpack-plugin is now deprecated in webpack 4.0.0.
- Then run npm i -D jest eslint.
Now open your code editor and add these scripts to your package.json:
"scripts": {

  "lint": "eslint . ",

  "build": "webpack",

  "watch": "webpack-dev-server --inline --hot"

},
Create a src folder at the root of. Inside of src create a main.js file that has:
import React from 'react';
import ReactDom from 'react-dom';
import App from './components/app';

const container = document.createElement('div');
document.body.appendChild(container);

ReactDom.render(<App />, container);
Inside of src create a components folder and inside of the component folder create a folder named app. Inside of the app folder create an index.js that has the following code:
import React from 'react';

class App extends React.Component {
  constructor(props){
    super(props);
  }

 render() {
   return (
     <div>
        <h1>MERRRRRN</h1>
     </div>
   );
 }

}
export default App;
Plus, let’s add a webpack configuration file. Also we're using the Sass loader, so your project can make use of Sass files for styling.
'use strict'

const ExtractPlugin = require('extract-text-webpack-plugin')
const HTMLPlugin = require('html-webpack-plugin')
module.exports = {
  devtool: 'eval',
  entry: `${__dirname}/src/main.js`,
  output: {
    filename: 'bundle-[hash].js',
    path: `${__dirname}/build`,
    publicPath: '/',
  },
  plugins: [
    new HTMLPlugin(),
    new ExtractPlugin('bundle-[hash].css'),
  ],
  module: {
    rules: [
      {
        test: /\.js$/,
        exclude: /node_module/,
        loader: 'babel-loader',
      },
      {
        test: /\.scss$/,
        loader: ExtractPlugin.extract(['css-loader', 'sass-loader']),
      },
    ],
  },
}
Here’s also our Babel configuration file:
{
  "presets": ["env", "react"],
  "plugins": ["transform-object-rest-spread"]
}
The Babel react preset converts JSX syntax and strips out type annotations.The Babel plugin transform-object-rest-spread transforms rest properties for object destructuring assignment and spread properties for object literals.
Now - in the frontend repo terminal window run the command npm run watch and navigate to the localhost URL in the browser. Everything should now be working!
Connecting the Frontend to the Backend
Here’s an example of a request made inside of a handleSubmit(e) method, inside of a SearchForm component named SearchForm.js
handleSubmit(e) {
  e.preventDefault();
  return superagent.get(`${__API_URL__}/api/flights/${ this.state.from }/${ this.state.to }`)
    .then(res => {
      this.setState({
        flights: [...res.body],
        hasSearched: true,
      });
    }).catch(err => {
      this.setState({
        hasError: true,
      });
    });
}
In this example, when handleSubmit is invoked by the user on the frontend, we use superagent to make a GET request to fetch our data from the backend, and we set hasSearched to true on the state of our component.
Making Sure Crawlers Can Read Our React js Application
Well about rendering of our React Js app, many times if we run our application and go to our particular page directly, there may be issues with content not showing up. This can cause a poor viewing experience for the user and it makes it difficult for Search Engine crawlers to index the site. To get around this, we recommend using something like Gatsby js or Next js. These two solutions are different from one another, but can both be useful depending on your needs.
Why use the MERN stack for your project?
The MERN stack is an excellent choice for companies wishing to develop high-quality web applications. Indeed, this stack, in addition to using high-performance and customized technologies, allows for web applications and software to be developed very quickly! Let's learn more,
The advantages of the MERN stack for the back-end
MERN stack is separated into two components: the back-end and the front-end. Added to that, the whole database system is isolated from the rest.
The whole system, including the front-end, the back-end, and the database, uses the REST API, which acts as a ‘middleware’ and is reusable for any other application: mobile software, etc., very easily.
- The REST API allows you to connect applications to each other like pieces in a puzzle. The REST APIs are based on HTTP and imitate web communication styles, making them very advantageous to use in the MERN stack.
- With the REST APIs, developers have the possibility, for example, of developing new front-ends and developing new applications that can be linked to the same system very easily.
- Node.js is very fast simply because it is an asynchronous language. Its performance is impressive compared to the average of other languages.
- A quick back-end means that users of your application will have access to their data much faster, and that is very advantageous indeed.
- Added to that, this increased speed will decrease the costs of operating the server.
The advantages of using the MERN stack for the front end
As the MERN stack uses the famous React.js, which is fantastic for front-end development.
- React.js is based on the single-page application (SPA) and this avoids loading a new page with each action and makes for a greatly streamlined user experience.
- The speed of design and development of websites and web applications,
- Reducing server costs,
- The performance of greatly optimized web applications and software,
- The ease of transposing a web application to a mobile application or software, thanks in particular to React Native,
- The luxury of designing a website using a single HTML document,
- The development of a computer application using a single language, JavaScript.
Summing Up!
I hope that this article has helped to clear up some confusion about what is MERN stack and how MERN works.
So if you are going to choose the MERN stack for your next project, definitely you are going to have an awesome experience. Let’s discuss your project!


Comments and Responses